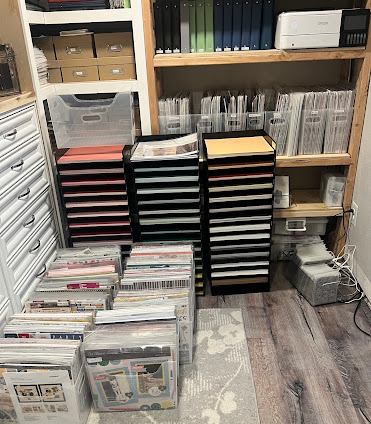
My new Cardstock and Pattern Paper Storage area and some Kit Clean Up.

 So, I was cleaning up my Enjoy the Ride kit and decided I should put it on camera.
Starts with kit clean up and then I have my wonderful paper storage area to share.
You Tube Video:


Organized Enjoy the Ride bits:


Overview picture


Hearts, tab, banners and arrows


Scalloped squares, banners, arrows, circle and tabs


The Bits:

Kit clean up products:
Enjoy the Ride workshop kit 
Tags and Tabs die set
Nested Essential dies
Decorative shapes dies
Arrow dies
Low tack tape
Photo mounting sheets
Die cut machine
tape or magnetic plate for your machine


Paper Storage area:


New paper area


The other side of the closet after the clean up (didn't get the top shelf in the pic)
Stamp, Die, Specialty paper, Printer and paper for printer storage 


Getting the paper trays ready and getting measurements as to what would work best
15 trays tall works the best.


Paper reorganized and ready for the shelves....

My Cardstock and Pattern paper storage area:

45 CTMH Paper trays 
Small - XL Multi purpose bins
right now, the bins are on sale (20% off) so if you've been thinking about them and just waiting grab them while on sale:) 
Label's for the paper trays
Label maker
Label tape
Pattern paper is stored in the Scraprack paper folders

Die wall storage:
Magnetic sheet
Frame


Dimensions for the shelves:

Each bin with pattern paper is 13 inches high so we left 14 inches to be safe between the shelfs.(there is 3 areas that meet this height)
Each shelf is 2 inches thick
The 15 CTMH paper trays are 32 1/2 inches tall so we allotted for 33 inches of height as I didn't need much clearance for the trays and paper once in place.
The usable width of the area is 42 inches wide

 *No monetary gain for any items with a link just sharing the best items I have found to help me out so far..

Comments

Popular posts from this blog

Stampin Up to Copic Color Matches - Subtles - Updated 4/20/20

Subtles Blushing Bride paper sample RGB code 249-194-188 HEX code #F9C2BC Copic Match  R21 Calypso Coral paper sample RGB code 241-116-91 HEX code F1745B Copic Match  R22 Petal Pink paper sample RGB code 240-206-188  HEX code #F0CEBC Copic Match  YR00 Alternative: RGB code 252-206-182 HEX code  #FCCEB6 Copic R12 So Saffron paper sample RGB code 255-218-141 HEX code FDDA8D Copic Match Y21   Soft Sea Foam paper sample RGB code 234-241-213 HEX code #FFDA8D Copic Match  G20 Pear Pizzazz paper sample RGB code 184-192-104 HEX code #B8C068 Copic Match  YG03 Mint Macaron paper sample RGB code 160-187-3165 HEX code #A0BBA5 Copic Match  G12 Alternative RGB code 159-197-170 HEX code #9FC5AA Copic match G21 Pool Party paper sample RGB code 169-221-199 HEX code #A9DDC7  Copic Match 

March Class

March Card Class Card Photo's Thanks so much for your patience this month on the photo's being after the class. This class was a huge one with Tish being Joining us. Wow it was a full house. The card photo delay was due to the butterfly die I had to have for a few of the cards. I am sure you agree the butterfly addition was worth the wait. Card #1 Thank you tag Card #2 Butterfly garden Card #3 Cow Dance Card #4 Sweet floral Card # 5 Celebrate Card # 6 So Sweet Card # 7 Celebrate Card # 8 Happy Birthday Card # 9 Squares of love! Card # 10 Circle Birthday Treat for participants of the class.

Paper Pumpkin Magic! - 3 layouts and 6 cards

  I received my paper pumpkin kit for July and wanted to create a few layouts and some of the cards. Video shows the cards and layouts - creating one 12X12 layout during the video for Nancy. You Tube Video: Cards: Daisy in Old Olive card  Flower in Melon Mambo card Poppies in Calypso Coral card Card details: Card base is from CTMH July Paper Pumpkin kit Inks - Artichoke, Rosy and Papaya Cuts: Card base from the kit cut in half then the floral front was cut to 3 3/4 X 4 3/4 the solid pattern was cut to 4 X 5 1/4 (cutting out 3 1/2 X 4 3/4 out of the center) Process: I added the corresponding ink to the card base to soften it and then I added the solid pattern and the floral pattern. I inked the edges of the floral and solid pieces from the kit then adhered them to the card base. I added strip pop tape to the frame and the flower piece then added it to the card. Finished with the included sequins. 12X12 Layout: Calypso Coral card 12X12 Layout bits: Kraft (2) 12X12, (2) 4 1/4 X 6 1/4 and