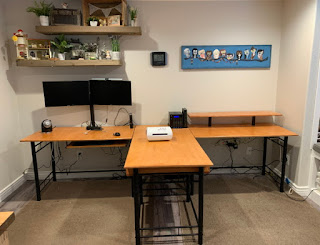
Ok so in hind sight I should have known the office desk was going to be a beast. We had it planned out too well to start with so of course there was issues.
June 14,2020
1st issue was we were only removing 1/2 of the desk - Jason's half so I was able to continue working downstairs and he was just off to the side. That went out the door in about a minute.
The new desk top was going to be kind of woven in. So that meant that the top had to be built at the same time not one side then the center then my side. So on demo day we went from a slight removal to a major haul it all out and figure the mess out later stance. Not my favorite demo day that's for sure.
 |
June 13,2020
This was taken just before Jason realized we needed to take everything out of the office.
I knew I had to clear off the center area so I had done most of that but then my computer had to be taken down. Probably wasn't as big a deal and I made it but I was having trouble loading pictures that day to the blog and so it became a huge deal really quick.
 |
This was the only desk area left in the room - Jason's work space for the next 4 or so weeks.
 |
Day 1 of the actual build. The wall support is up and the center unit is framed.
I spent the week painting the center base and the wall supports.
Base painted white and the wall support painted the wall color.
The base supports added to both sides and then painted where will be seen
View of the unit from the closet.
June 21,2020
Started planning the top area of the desk.
June 27,2020
Desk top planned out - next its to be secured down.
July 1,2020
Finally picked out the stain color we liked and got the desk stained and then poly'd
Had to wait another week to start putting stuff back in the space.
Completely spaced getting pictures of the desk before we started on the hutch areas.
July 18,2020
Desk area back and the top hutch started for my side.
Jason's desk all finished
July 20,2020
The side piece was added in but still had to paint the shelves and the whole unit needed to be attached to the 1st unit.
Started working on getting some of my stamps and dies into Evernote. They had been piling up waiting for me to have some time and space to enter them in.
July 31,2020
Took a couple of pictures of our progress. this is the finished project. I have a smidge more decorating to do but not sure when that will happen.
My new ink holder is in place very happy to have it now and as seen before my copic markers are up high so Miranda can't use them. I got a Totally Tiffany Embossing station. Have not used it but it looks cool on my desk.
Jason's side and a view of the center area with the baskets I chose
Part of the old desk was cut to make a small desk for Miranda - We are looking at small desk plans for her that will be a bit more stable. She is using my area more then hers so I have to be diligent in cleaning up each day when I leave my desk or she ruins my thing. Lovely right!
Also notice the amount of pens she has by her desk. She still wants to use my copics.


Comments
Post a Comment