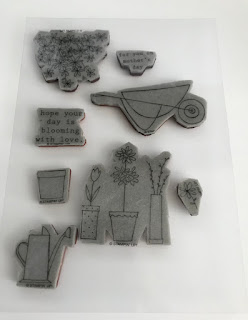
Stamp Clean Up Process


Here is a bit of information about what I have been doing with my Stamps to get everything compact and nicely organized.  It is a long process if you have a lot of stuff not so much if you don't.

Wood Stamps:
If it is wood mount and you have not unmounted them then that is of course step #1
Easy to do just put 1 wood block in the microwave at a time.
Size:
Small 5-10 sec
Medium 10-15 sec
Large 15-20 sec
Background 20-25 sec
Start with smallest time and check if pulls off easy.
The wood will get warm to hot as you have it in the microwave for longer periods of time so be careful.


Got a bunch of $2 wood mounts at a recent sale, here is one of them


Microwaved this one 15 sec

removed it from the block 

then quickly removed the sticker and placed it on the backing
 Best to work with 1 block remove stamp and if Stampin up you can remove the sticker as well and place that on the top of the sticky area so you can see the stamp. trim as needed. I like being able to see the image while I stamp so this is important to me.

I use this ez mount thin

If it is a non SU stamp or does not have the sticker on the top then I choose to remove the foam as well and replace with EZ Mount. Its a foam without the sticky on one side. The sticky side is super duper sticky so use scissors that you don't care about and clean frequently. I use De-Solve-it but goof off would work as well

Clear Mount  is easy just take them out of the package and put the stickers on (if not already done)
Get a sheet of acetate and cut to the size of your storage envelope

and Photopolymer is the easiest as it is already attached to the plastic.


finished the set in about 2 minutes possibly less
Take the stamps with the image sticker and trim to fit the stamp.
(see the extra plastic around the stamps)


Packaging Needs:
scissors
Avery Elle Large plastic envelopes
5 1/4 X 7 1/4 White paper
5 X 7 Clear Plastic acetate (thin)
Scotch double sided tape
Brother Label machine
I use size 12 mm white tape with black lettering

Next add a small amount of Scotch double sided tape to the backing and
adhere it to the Acetate sheet 


then slide the acetate sheet into the plastic pocket. 

Now this set is ready to go into Evernote and get filed with my other stamps.


Comments

Popular posts from this blog

Baby Boy Book - Echo Park Special Delivery Baby/Boy

 Working on a gift for a dear friend who just had a baby boy. Love this paper and the coordinating cardstock I am using to bring out its cuteness. Struggling with the stickers a bit but will work more with those later. You Tube video Intro page: Bits: Echo Park - Special Delivery Baby & Special Delivery Baby Boy Mossy Meadow 8 1/2 X 11 1/4 Plaid pattern 8 X 10 3/4 Mossy Meadow Banner 3 1/2 X 10 Perennial Postage die (Largest size) Mossy Meadow ink Baby Layout: Bits : Echo Park Special Delivery Baby & Special Delivery Baby Boy Mist (2) 8 1/2 X 11 1/4 (4) 1/4 X 8 1/4 (3) 3 1/4 X 3 1/4 (2) Lg stamp images Blue triangle pattern (2) 1X6 and (2) 6X6 Star pattern (2) 3X8 Toffee Award circle 3 Inches cut in half Tags (2) 2 1/4 X 4 1/2 Flagged pattern pieces (2) 3/4 X 1 Mist ink Toffee ink Perfectly Imperfect Patterns (CM) Dots Ribbon 1 Month Layout: Bits: Echo Park Special Delivery Baby & Special Delivery Baby Boy Toffee (2) 8 1/2 X 11 1/4, (4) 3 1/4 X 4 1/4 and (2) stamp cuts ...

Wildflower Birthday - Bonus Project

  Wonderful set of layouts using the Wildflower Birthday workshop set and 1 set of DSP and stickers.  Love this paper and embellishments and had so much fun creating this group of layouts and bonus item.... You Tube Video: Products used: Wildflower Birthday workshop kit Wildflower Birthday DSP and stickers Birthday Celebration stamp set and dies Wildflower Celebrations stamp set Mini Book Pictures: Cover Cover/Spine and Back: Pages 1 & 2 Pages 3 & 4 Pages 5 & 6 Pages 7 & 8 Pages 9 & 10 Pages 11 & 12 Pages 11 & 12 Cricut file #Birthday #WildflowerBirthday #SU #Scrapbooking #Celebrate 

Sentimental Christmas - 12X12 & 8 1/2 X 11 Layout shares

  Purchased the workshop kit from Julie Carriere .  Loved the candy cane Layout and wanted to recreate it Ended up really enjoying this whole collection and process. Very fun and a little messier than I normally participate in but very enjoyable.  You Tube video: Layouts: 12X12 Candy cane layouts: 8 1/2 X 11 Layouts: Allison's 1st Christmas Layout bits: Real Red cardstock (2) 8 1/2 X 11 1/4, 5X7, 1X7 and 2 1/2 X 7 White Willow (2) 8 1/4 X 11 Striped pattern 4 X 11 1/4 and 6 3/4 X 8 1/4 Stocking pattern 5 1/2 X 7 7/8 and 5 1/2 X 8 1/4 Flowers - White shimmer paper Greenery - Shaded Spruce, Gold adhesive metallic backed gems Metallic enamel effects - gold SU Mini Alphabet 12X12 Layout - Winter Wonderland 8 1/2 X 11 Layouts:                         Layout Bits: White Willow cardstock (2) 8 1/2 X 11 1/4 and 8X9 Gold cardstock 8 1/2 X 10 3/4 (2) 1/4 X 3 1/2 and 1/4 X 4 1/4 Tree pattern 5X7, 4 1/4 X 5 and 3 1/2 X...